In this post, we set up a responsive and interactive dev blog using GitHub Pages in combination with the Chirpy Jekyll Theme and Google Cloud. The blog has the same setup as vanSoest.dev, featuring view counts, tags, categories, a search bar, and a dark theme toggle. The blog should provide any developer with a portfolio to easily and aesthetically collect sharable guides, notes, thoughts, and opinions using Markdown. What’s more, the blog is completely free, and without licensing restrictions.
In an overview, we setup a GitHub Pages repository with Chirpy Jekyll Theme and a CDN with Google Cloud.
Markdown Dev Blog | GitHub Pages
Source: Getting Started | Chirpy
In the steps below, we setup our main dev blog website. In short, we set up a GitHub Pages repository with the Chirpy Jekyll Theme. Optionally, we may set a custom domain with a certificate for https.
Creating a GitHub Account
In order to continue, we need a GitHub account, sign up here. In the steps below, the GitHub account name is referred to as <github_username>. Moreover, in case a custom domain is not desired, note that the blog URL will match <github_username>.github.io.
Setting up GitHub Pages
We use Chirpy Jekyll Theme as our GitHub Pages theme. As mentioned by Getting Started | Chirpy, there are two ways to set up the blog.
For simplicity, we use the first step. Accordingly, follow the steps below.
Sign in on GitHub.
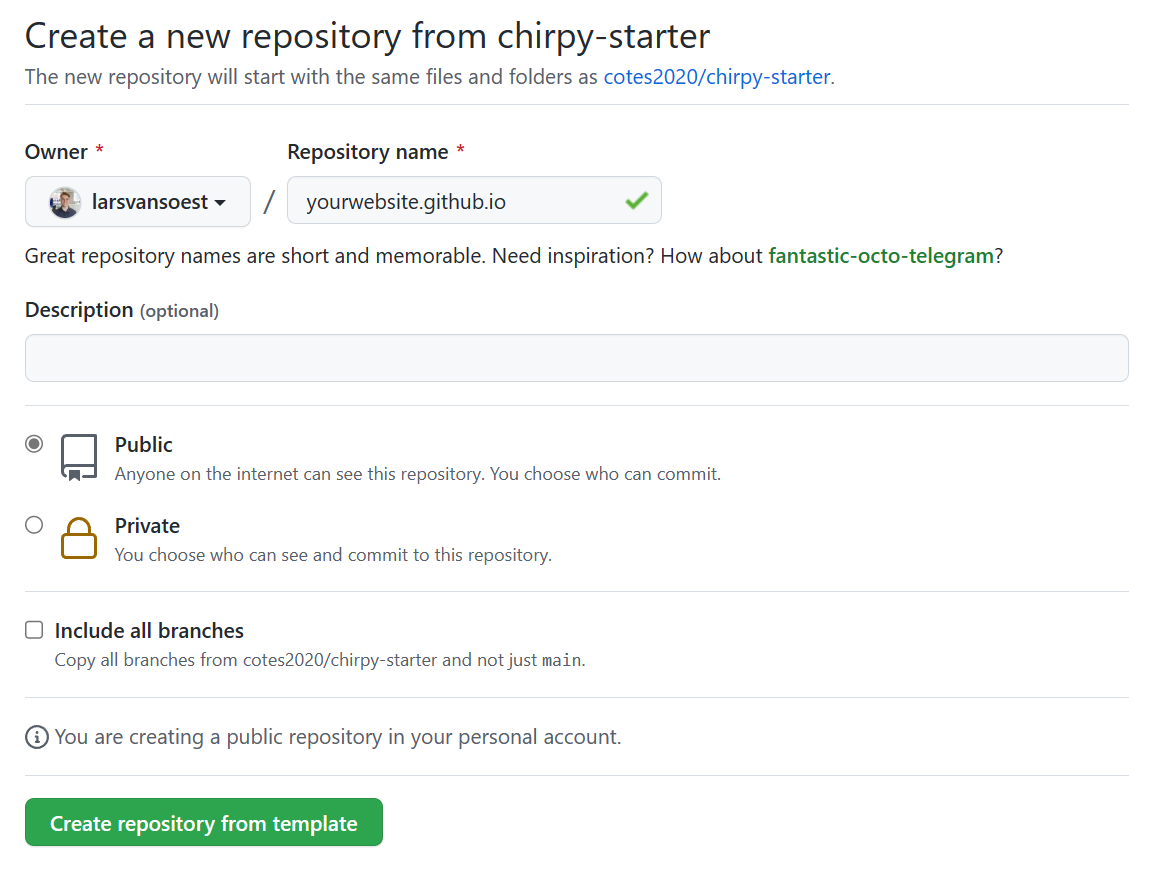
Create a new repository from chirpy-starter.
- Set the Owner to the GitHub user
<github_username>. - Set the Repository Name to
<github_username>.github.io. - Set to public (default).
- Uncheck Include all branches (default).
![Screenshot when creating a new repository from chirpy-starter]()
- Set the Owner to the GitHub user
Now, we have successfully created the repository. Clone the repository locally.
If you are unfamiliar with git, checkout GitHub Git Guide and git-scm.
In the local repository folder, set the value for property
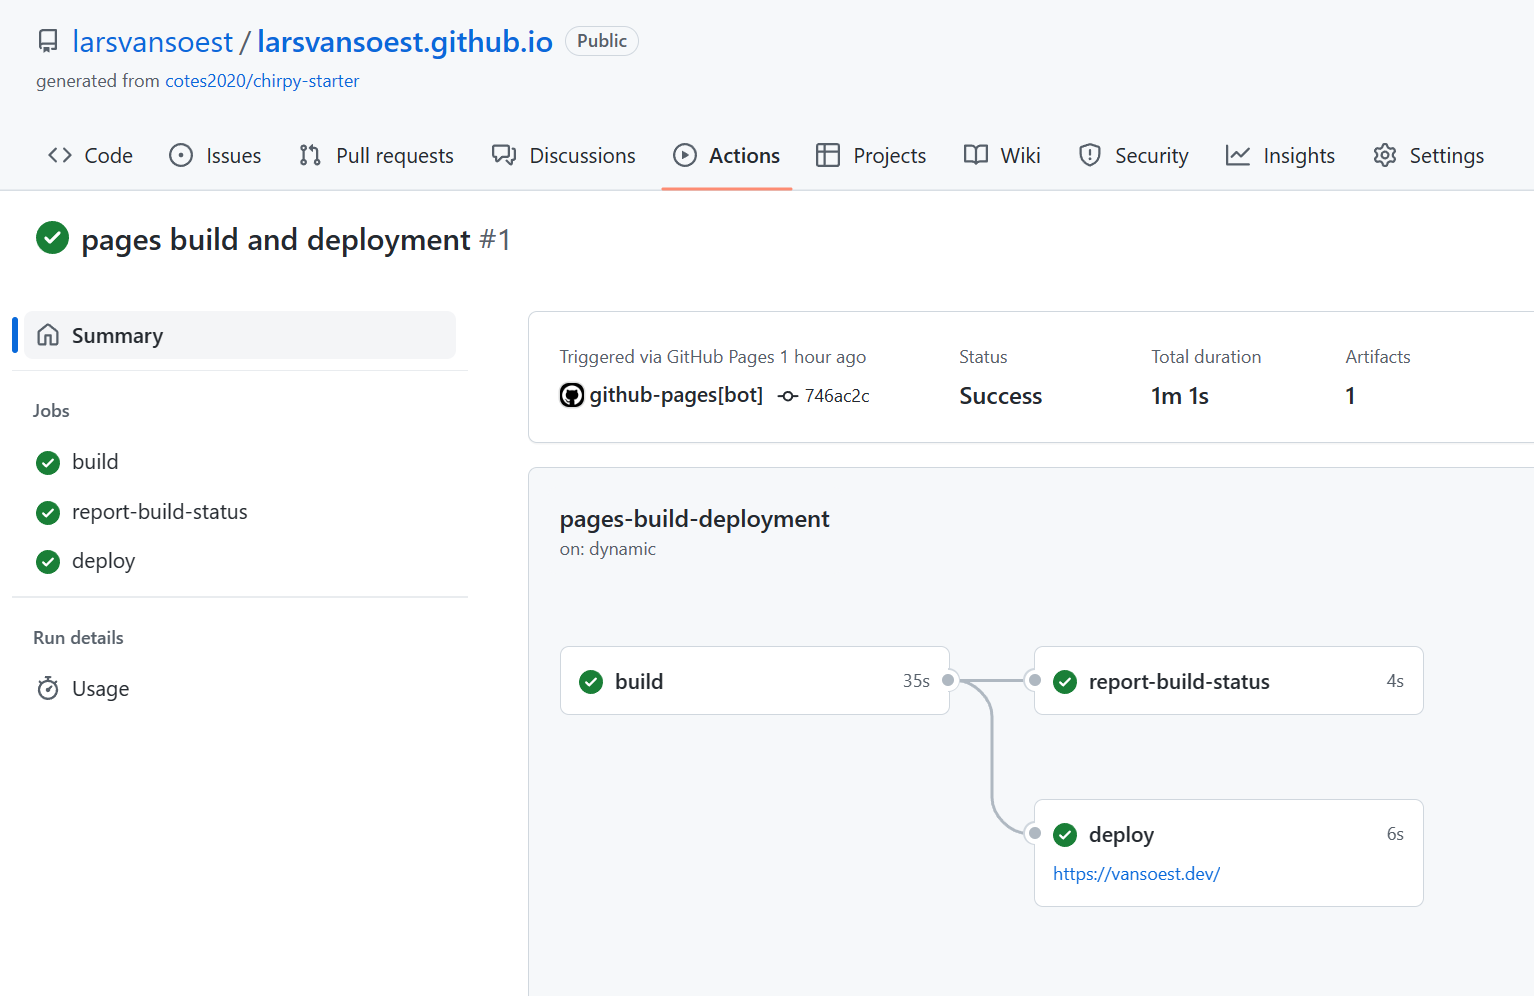
urlof_config.ymltohttps://<github_username>.github.io, then push the change to trigger a GitHub Action to publish the blog.Head to
https://github.com/<github_username>/<github_username>.github.io/actions, or Actions on the repository. Check the publishing status. After a few minutes, once resolved, a new branchgh-pagesis added to the repository on GitHub, which contains the built source of the blog page.![Screenshot of resolved publishing action for the blog page.]()
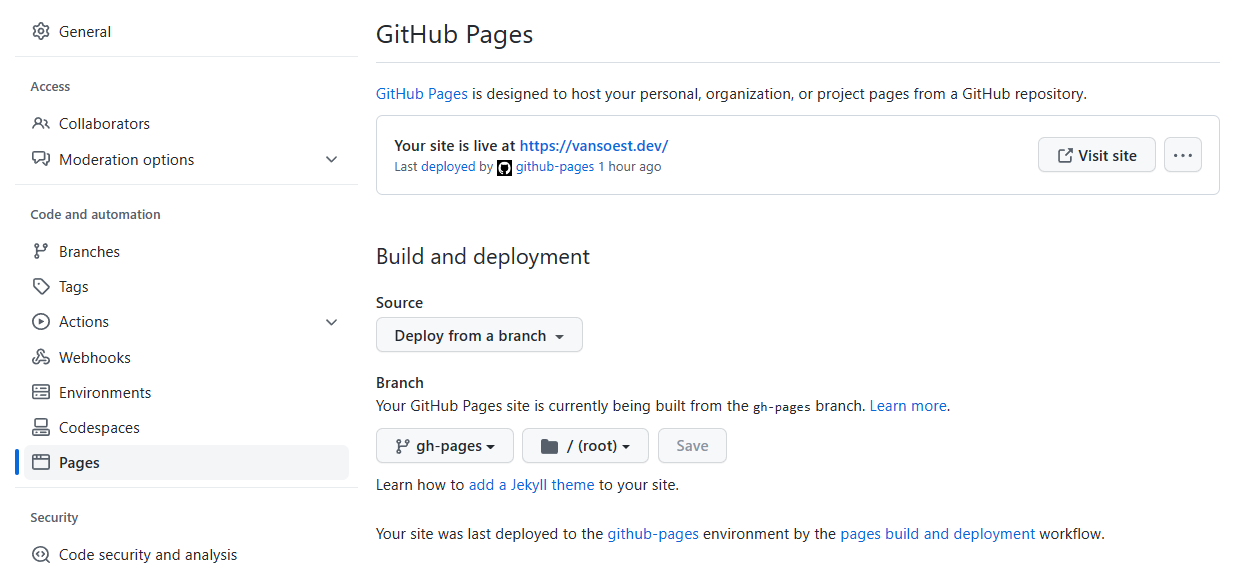
Head to
https://github.com/<github_username>/<github_username>.github.io/settings/pagesor Settings > Pages on the repository, and set the page source as follows.- Set Branch to
gh-pages. - Set Folder to
/(root). - Click Save.
![Screenshot when setting branch gh-page as source.]()
- Set Branch to
After a few minutes, head to
https://<github_username>.github.ioand view the new website.
With the steps above, we have created the base dev blog website. For the rest of this section, we investigate personalisation. In short, we set up a custom domain and modify the page’s css and favicon.
Custom Domain
In this section, we setup a custom apex domain with https support. Moreover, we configure the DNS by setting up A-records for the domain and its www subdomain. Subsequently, GitHub creates and maintains the required certificates for us.
For instructions on how to configure a subdomain and other alternative methods, see Managing a custom domain for your GitHub Pages site - GitHub Docs.
To use a domain, we must own it. So, for starters, make sure to own the desired domain for the blog.
In the DNS settings of the domain, add the following A-records.
Type Name Value A @ 185.199.108.153 A @ 185.199.109.153 A @ 185.199.110.153 A @ 185.199.111.153 A www <github_username>.github.ioDNS changes can take up to 48 hours. If an error occurs, ensure the A-records are correct and wait for the changes to resolve.
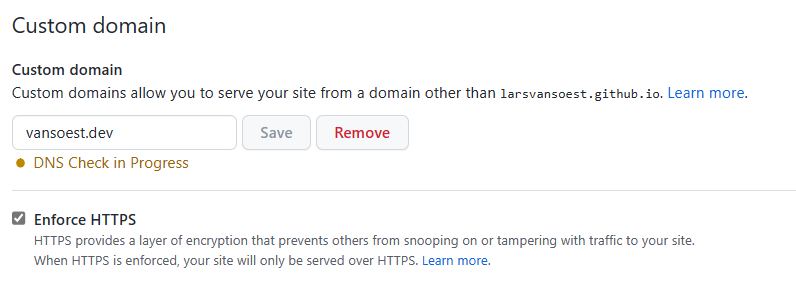
Head to
https://github.com/<github_username>/<github_username>.github.io/settings/pagesor Settings > Pages on the repository. Under custom domain, enter the configured domain, and click save.![Screenshot of setting custom domain]()
Set the value of property
urlof_config.ymlto the desired domain name (e.g.https://vansoest.dev).Type the configured custom domain in the browser and view the blog.
Page Customisation
In the steps below, we customise the blog’s stylesheet and favicon. To do so, add the folder /assets/ relative to the project folder.
For reference, after customising the css and changing the favicon below, the project structure should match the example project structure below.
📦<github-username>.github.io
 ┣ ...
 ┣ 📂assets
 ┃ ┣ 📂css
 ┃ ┃ ┗ 📜style.scss
 ┃ ┗ 📂img
 ┃ ┃ ┗ 📂favicons
 ┃ ┃ ┃ ┣ 📜android-chrome-192x192.png
 ┃ ┃ ┃ ┣ 📜android-chrome-512x512.png
 ┃ ┃ ┃ ┣ 📜apple-touch-icon.png
 ┃ ┃ ┃ ┣ 📜browserconfig.xml
 ┃ ┃ ┃ ┣ 📜favicon-16x16.png
 ┃ ┃ ┃ ┣ 📜favicon-32x32.png
 ┃ ┃ ┃ ┣ 📜favicon.ico
 ┃ ┃ ┃ ┣ 📜mstile-150x150.png
 ┃ ┃ ┃ ┗ 📜site.webmanifest
 ┣ ...
CSS
We customise the stylesheet with a new SCSS file. With this file, we overwrite and add CSS rules.
Relative to the project folder, create folder
/assets/css/and file/assets/css/style.scss.Create a new file
assets/css/style.scss, and add the contents of Chirpy’s style.scss.
In this new file, any css customisation we may add under the file’s contents. For further reference, consider the avatar size modification of vanSoest.dev.
Favicon
Source: Customize the Favicon | Chirpy
To change the blog’s favicon, prepare a square image of size 512x512 or more, and follow the steps below.
Relative to the project folder, create folders
/assets/img/and/assets/img/favicons/.Create new files
assets/img/favicons/browserconfig.xmlandassets/img/favicons/site.webmanifest, and add the contents of Chirpy’s browserconfig.xml and site.webmanifest respectively.Upload the square image to Real Favicon Generator. Scroll down and click Generate your Favicons and HTML code. Download the package by clicking Favicon Package.
Extract and add all
.pngand.icofiles to/assets/img/favicons/.
For reference, check if the folder structure matches the one illustrated above.
Running Locally
To preview the blog locally, follow the steps below.
Based on the operating system, follow the instructions at Installation | Jekyll.
Relative to the project folder, execute
bundle installandbundle exec jekyll s.To view the blog, navigate to
localhost:4000or127.0.0.1:4000in the web browser.
Once satisfied, to publish the changes, commit the changes to the remote repository.
CDN with Google Cloud
Last but not least, we set up the content delivery network (CDN) for our images. With the steps below, with Google Cloud, we set up a load balancer to cache and deliver imagery for our posts. In the steps below, we use a subdomain of the custom domain to enable https.
For the steps below, if prompted to enable a required API (e.g. Compute Engine API), enable it to continue.
Creating a Project
For starters, we need a project to construct our infrastructure.
Navigate to console.cloud.google.com and login or create an account.
Create a new project and select it as the current project.
Creating a Bucket
Below, we set up a bucket to store the blog’s content and make it public.
With the project selected, type
storagein the search bar and click on Cloud Storage and Create Bucket.Enter a name for your bucket and select the desired region(s).
In Choose how to control access to objects, uncheck Enforce public access prevention on this bucket. Leave the rest of the options as default. Click Create.
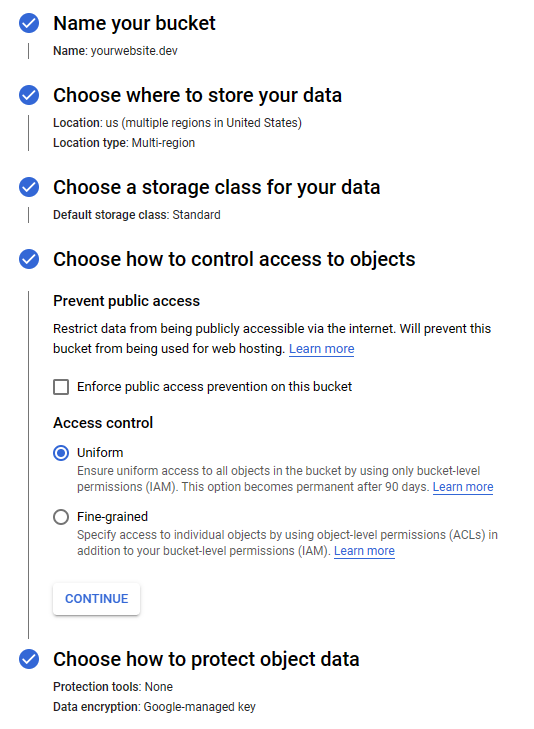
- Now, we set the bucket to public. In the bucket details view, click Permissions and, click Grant Access. Add
allUsersas principals and select the roleStorage Object Viewer. When prompted, click Allow Public Access.

This enables public access. Enabling public access for a bucket will make its contents accessible to the internet. Be mindful when uploading files.
Setting up the Load balancer
In the steps below, we setup cloud CDN with a load balancer, which can be accessed through the subdomain load balancer of our custom domain.
With the project selected, type
load balancerin the search bar and click on Load Balancing.Click Create Load Balancer and Start Configuration for HTTP(S) Load Balancing. Keep the default options, and continue.
If the page fails to load after clicking continue, ensure the Compute Engine API is enabled.
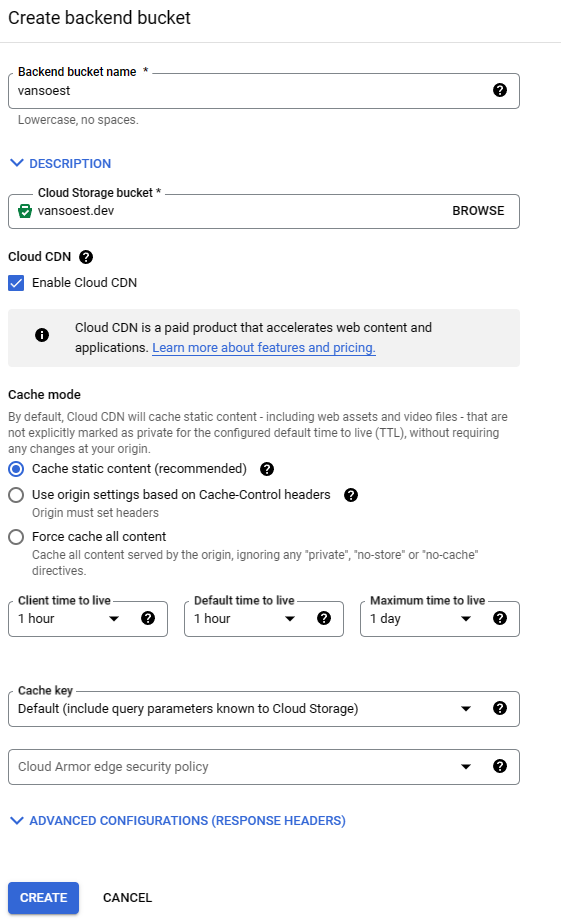
Configure the Load Balancer as follows.
At Frontend configuration, enter a name, and select https as protocol. At Certificate, click Create a New Certificate, enter a name, select Create Google-managed certificate, enter
loadbalancer.<custom_domain>at domains, and click Create.At Backend configuration, select the dropdown for Backend services & backend buckets and Create a Backend Bucket. Enter a name, select the bucket created above, select Enable Cloud CDN, keep the default options, and click Create.
![Screenshot of creating a backend bucket]()
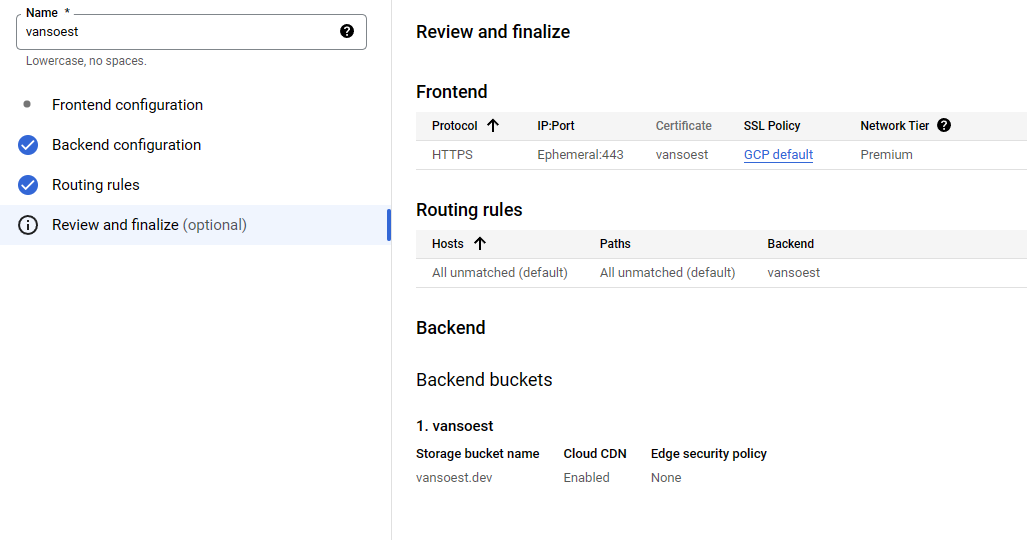
At Routing Rules, set mode to Simple host and path rule, select the backend bucket created above.
Review the load balancer’s settings and click Create.
![Screenshot of reviewing the load balancer]()
At the created load balancer’s details, find the load balancer’s ip-adress. Modify the DNS of your custom domain by adding the following rule.
Type Name Value A loadbalancer <loadbalancer_ip>It might take around 1 or 2 hours for the DNS and certificate to resolve.
In
_config.ymlof the project, set the value for propertyimage_cdntohttps://loadbalancer.<custom_domain>.
Upload and Use Imagery
After the steps above, to use images in our posts, we can upload them to our bucket and reference them in our markdown file.
To upload images to the bucket, select the project in Google Cloud. Then, type storage in the search bar and click on Cloud Storage. Select the bucket created above, and set up a file structure as desired. An image can be referenced in a post with .
Notes
Disqus Comment Sections
The Chirpy Jekyll Theme comes with the option to set up a comment section by Disqus. However, Disqus’ free plan users must show advertisements inside the comment sections. What’s more, watermarks from the company can only be removed with a pro plan. Therefore, this feature is left out of the guide. In the future, we might integrate an open-source comment section with the theme.